- Home
- Vividless Flier girl
- Lifestyle
- _Self improvement
- _Handle Mental-Stress
- _Your image shines
- _Drastic Reality is Change
- _10 Effective Adult's Bed Time Routine
- _Strong Personality that anyone can achieve
- _Going-Green Really means?
- Travel
- Diet Plan
- _What to eat Before & After Yoga
- Privacy Policy
- Google ads

Showing posts from 2020Show all


Yoga pose


The Journey of yoga Explains Basic yoga pose for beginners
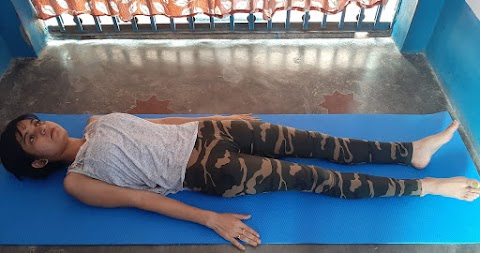
1. Savasana(Corpse Pose)

As Yoga has become modern exercise which shown it's own benefits to the physical and mental endeavors. The art of relaxation is harder than it looks. We all may have that art by enduring our body to some limit.
This is one of the basic pose that any beginner can do it. Most important this pose will let you know how to sleep better during sleeping time.
Step by step Instruction:
- Come on the yoga mat or on the floor.
- Simply lie on the mat.
- Now open your both leg straight to the outside as both the leg should parallely and close.
- Spread your both the arm on the floor side by your thighs.
- Open your palm and spread it on the floor.
- Look or mak a concentrate at one point and take a deep breath and exhale it.
- Do it for 10 to 15 times.
Benefits:
- It provides a better sleeping position.
- It helps to release the stress.
- It makes your body and mind to relax as well being.
- "Shavasana" helps in reducing heart beat and blood pressure.
- It provides deep relaxation and, reduce the metabolic rate and reduce anxiety.
2. Ananda Balasana

- The name Ananda means "Blissful" Bala means "Baby" Asana means "Pose. So Ananda Balasana Pose is also called "Happy Baby Pose".
- This is basic level of asana. This asana is very effective for baby as it has a positive impact on the body.
- Before you do this asana make sure that your stomach are empty. You need to keep a gap of at least 4 to 6 hours between your meal and work-out.
To know in detail about Benefits of Ananda Balasan click here:
3. Balasana

Child Pose is also known as "Balasana". Balasana means Bala refers "Child" And Asana refers "Pose". It is basic pose which you can do early morning at your bed also. Child Pose is one of the gentle resting pose which helps you to stretches thighs, low back, hips, knees and ankle. @TheJourneyofYogaAsana
The menstruation cycle is very delicate. You may be the one who can be in any of the state. After working whole day, travelling,stressed and doing ups and down you might feel low so you understand better to avoid it.
To know in detail about Benefits of Balasan click here:
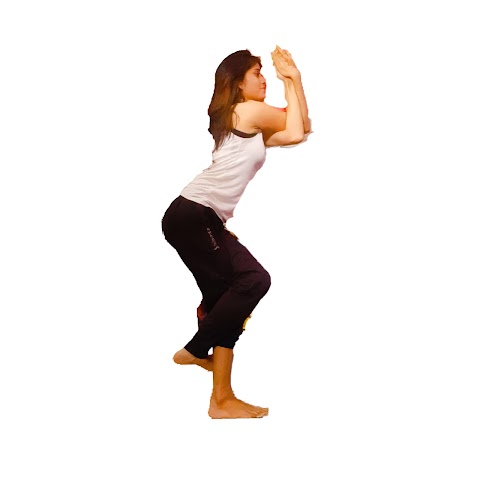
4. Chair Pose:


To know in detail about Benefits of Chair Pose click here:
5. Eagle Pose:

To know in detail about Benefits of Eagle Pose click here:
3. Balasana

Child Pose is also known as "Balasana". Balasana means Bala refers "Child" And Asana refers "Pose". It is basic pose which you can do early morning at your bed also. Child Pose is one of the gentle resting pose which helps you to stretches thighs, low back, hips, knees and ankle. @TheJourneyofYogaAsana
The menstruation cycle is very delicate. You may be the one who can be in any of the state. After working whole day, travelling,stressed and doing ups and down you might feel low so you understand better to avoid it.
To know in detail about Benefits of Balasan click here:
4. Chair Pose:
It is the most intensely powerful pose. This pose strengthen the muscles of the thighs, legs and arms.It builds willpower on the body and the mind.
Being a beginner it isn't easy to stretch out out the body,but regular practice was enough to fabricate my body on the Yoga mat. Into every session of Half an hour, i had fallen multiple times, felt pain, sweaty, and had almost made my mind-Not to give up.
Being a beginner it isn't easy to stretch out out the body,but regular practice was enough to fabricate my body on the Yoga mat. Into every session of Half an hour, i had fallen multiple times, felt pain, sweaty, and had almost made my mind-Not to give up.
This yoga is beneficial for those who is suffering from conditions, such as chronic pain, carpal tunnel syndrome.
5. Eagle Pose:
Garudasana name is usually comes from, Garuda" The king of birds" asana means "Pose". Garuda word was originally identified with" all the consuming power of god's rays".In english this pose is rendered as "Eagle Pose".
To know in detail about Benefits of Eagle Pose click here:
The Journey of yoga Explains Chakrasana
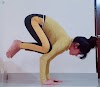
Yoga : Chakrasana(Wheel Pose)
Target: Back bend, Flexibility, Arm, Hips, thighs
Level: Advance
Chakrasana
(Urdhva Dhanurasana):

(Urdhva Dhanurasana):

Beginner's Tips:
Chakrasana is also called Wheel Pose because when you get into this pose, it forms a shape of wheel.
This Pose is considered as one of the tough asana because it's totally body stretching yoga asana. If you are beginner or new to this asana you will feel difficulty as you bend your body, arms and shoulders. While doing this pose it not only overtax your arm but will also tend to compress the lower spine.
So, before you go for this asana you need to do some basic asana like Mermaid Pose( king Pose), Cow Pose, Bhujangasana, Urdhva Mukha Svanasana, Siddhasana, Ardha chandrasana, Virasana, Halasana. It will bring flexibility and open your arms and heart
Chakrasana preparatory Poses:
You can watch over here:
You can watch over here:
Step By Step Instructions:

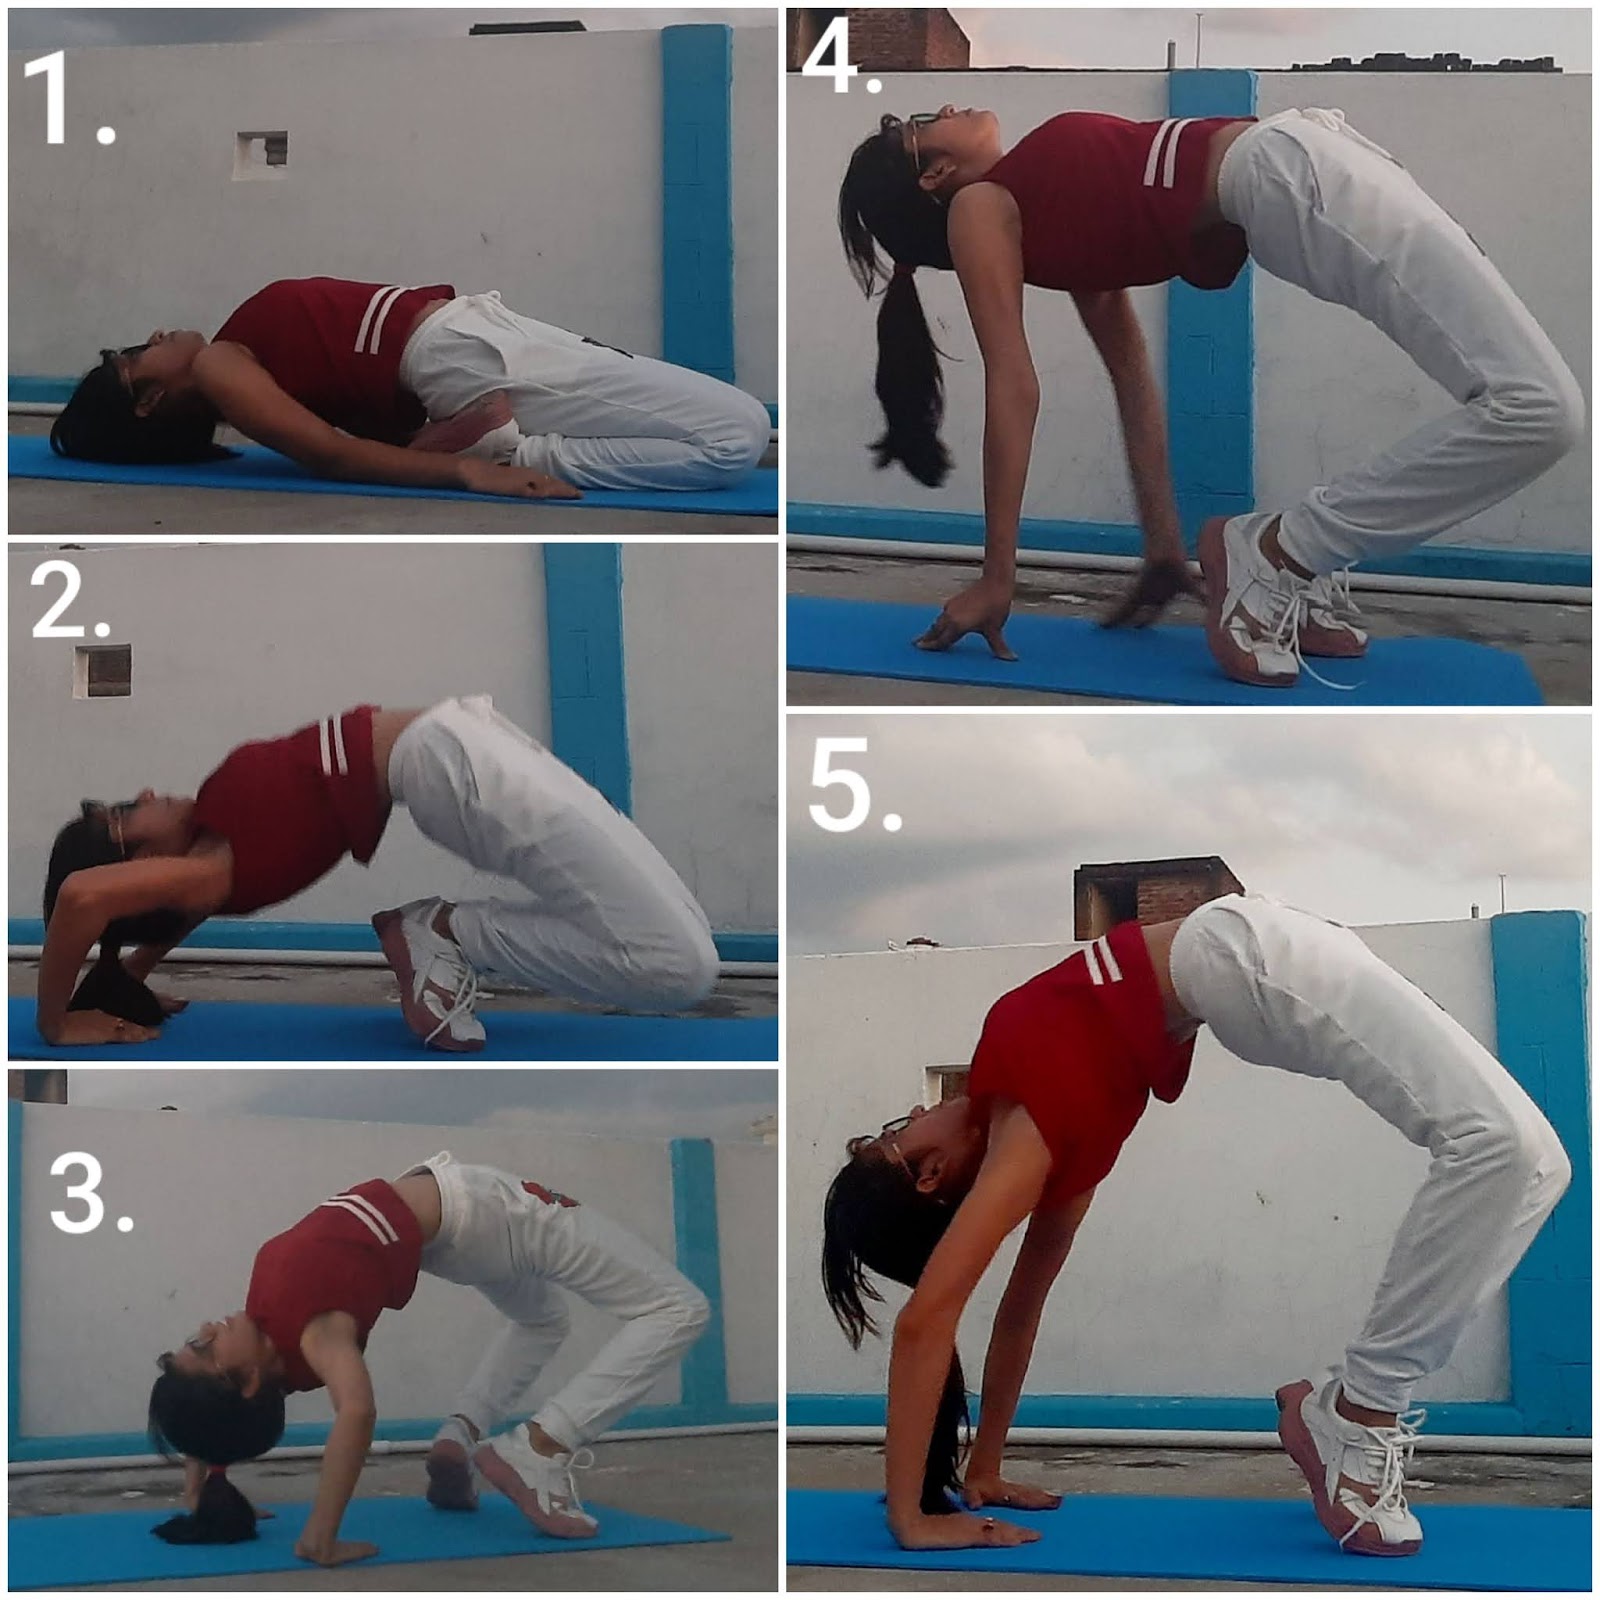
- Chakrasana is one of the pose that can be done in both the way by sleeping as well as standing position.
- If you are beginner i will suggest you to start with the sleeping position.
- Come on the Yoga mat or on the Floor, Start with Savasana Pose.
- Now Fold your leg through your knees and make sure that your both the feet and your back touch the floor firmly.
- Move your both the hand towards the back side passing it over head and keep aside of your head placing your palm inward direction.
- Push your lower back towards upward by making force on the palm and feet.
- As your lower back slightly raised then push your upper back shoulder towards up.
- Allow your head to fall gently behind, in between both the hand and keep your neck relaxed.
- Still you feel it's not complete pose that you are doing you can move your hand or leg towards inside of your body.
- Stay in this pose for 30 second to a minute and inhale and exhale while doing the asana.
- Now you bring down your lower back slowly and release your hand slightly all together and put all your body weight down on the floor, Bring your back folded hand down on the floor and come back to actual position.
Benefits:
- It is a backbend posture which brings flexibility & strength to spine.
- This asana is very beneficial for asthma patients.
- It opens the chest and arms.
- It stretch arms and spine.
- This asana helps in strengthening the muscles of hand and reproductive organ.
- It stimulates the endocrine glands and maintain the body metabolism.
- It helps in purification and circulation of the blood.
- It reduces stress and anxiety.
- It brings activeness to your body as it builds stamina.
- It sharpens eyesight.
Caution:
Since Chakrasana puts lots of load & weight on your wrist so it is not recommended for those who is having any kind of back injury or spinal injury. Try to avoid if you have glaucoma and high blood pressure. If you feel its a long back injury and you are comfortable to do this asana, consult to the doctor before you fall for this pose.
You need to go through this asana
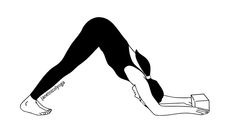
The Journey of Yoga Explains Ardha Pincha Mayurasana:
Yoga: Ardha Pincha Mayurasana
Target: Hips, waist, arms, Reduce belly
Level: Advance
Ardha Pincha Mayurasana:

Beginner's Tips:
If you are beginner for this pose, start with Utkatasana pose. Make your body bend towards up and down. make a leg and hand movement to get stretchable to get into this pose. Doing this you will easily fall for this asana.
If you are beginner for this pose, start with Utkatasana pose. Make your body bend towards up and down. make a leg and hand movement to get stretchable to get into this pose. Doing this you will easily fall for this asana.
Step by Step instruction:
- It is basic Yoga Asana. Ardha Pincha Mayurasana is standing asana. and a mild inversion pose.
- Start with Tadasana Yoga pose. Come on the Yoga mat and stand straight.
- Now Bring your both leg closer and parallel to each other.
- Bend towards forward getting on your knees and hands.
- Place your forearms on the floor, ensuring your both elbows and shoulder are in same straight line.
- Head down your head in between both the elbows.
- Lift your hip and back. As you Pose tuck your toes and keep your leg straight.
- Inhale and take a breath while raising hips.
- Moves your hips back and exhale.
- Lift your forearms and your elbow move back and stand straight to the actual position.
- Stay in this pose for 15 sec to a minute.
Benefit:
- This asana helps you to calm the brain and relieves stress.
- It helps in stimulating the reproductive organs, and reduce menstrual discomfort.
- it strengthens legs and arms.
- It helps in improving digestion.
- It is an aid for asthma,blood [pressure and fat feed].
- It stretches hamstring, shoulders.
Caution:
Avoid doing these asan if you have asthma & diarrhea.If you have any kind of injury to your health, consult to the doctor or Yoga instructor before you start practicing.
You may also like to go with these Pose :
Mermaid Pose
Dolphin Pose
Ananda Balasana
Garudasana
Balasana
The Journey of Yoga explains "Mermaid" yoga pose
Yoga Pose: "Mermaid"(Advance pose)
Equipment needed: Yoga mat
Target:Hips,Shoulder,Thighs,Chest, Knees
Mermaid Pose (Eka pada Rajakapotasana)
") |
| Mermaid (Eka Pada Rajakapotasana) |
"Mermaid " Yoga Pose is one of the advanced yoga pose. It's one of my favorite yoga poses of all time. It may be tricky for you at initially as it requires back bend.So not to worry, i will teach you from the basic that will make easy for you to do. Rajakapotasana is a seated back bending asana in modern exercise. This pose deepens and intensifies the hip stretch while adding more advanced back bend.
"Mermaid Pose" is also known as Heart open pose
I remember when i did it for the first time in a while, it was easy for me to do, because i have practiced other yoga which required back bend posture like ( Plank Pose, Halasana). So don't ever try to achieve the perfect pose at initial stage only.
If you think you can do, then make sure you are fully comfortable with all your body parts and also warm your thighs and hips thoroughly before trying "Mermaid". Everything requires practice before reaching to final stage.
Beginner's Tip:
By cultivating the strength and fluidity of "Mermaid" throughout the practice. The more you maintain the strength and stability that comes from your arms and leg, the more you will be able to open to the feelings of fluidity in this pose by strengthening the legs and pulling it to the upwards along the length of your spine.
Step by Step instruction for "Mermaid"

- To get started do the several round of Sun Salutation then perform warrior Ⅰ and Warrior Ⅱ extended side angle.
- Sit on the mat or floor by crossing both legs.
- Now unwind your one leg and bring it back to your hips.
- Keep other leg folded as it is.
- Move your one hand to the back of shoulder passing it through one side of your head.
- Other hand take back in such a way that you can hold both the palm one over the other.
- Fold your back sided leg through knees towards up to hold it over both the joined and.
- Move your face towards the folded leg on the floor.
- Stay in this pose for 30 sec to a minute.
- Now bring back your back side folded leg on the floor and release both the hand slowly to come back.
Mermaid's Benefits:
- It improves control over your sexual desires.
- It helps in open chest and shoulders.
- It brings more flexibility, stronger lower back and hips flexors.
- You will get freedom from back ache.
- it makes pelvic stronger.
Caution:
Try to avoid doing this if you have any kind of injury or chronic injury to the shoulder, knees and ankle. And if you have experienced high or low blood pressure or heart disease better do not practice. But still if you feel comfortable,consult to the doctor before falling into this pose.
You may also like to go with these Pose :
Bakasana
Bitilasana(Cow pose)
Garudasana(Eagle Pose)
Balasana (Child Pose)
The Journey of Yoga Explains Garudasana (Eagle Pose)
Yoga: Garudasana
Target: Hips,shoulder, arm
Target: Hips,shoulder, arm
Gaudasana(Eagle Pose)

Garudasana name is usually comes from, Garuda" The king
of birds" asana means "Pose". Garuda word was originally
identified with" all the consuming power of god's rays".
In english this pose is rendered as "Eagle Pose".
Start doing with the standing pose (Tadasana). Bend your knees
slightly and cross your right thighs over the left thigh just by like twisting one leg over the other.
Point your left toes towards the floor and Apply force on toes of the left leg, hook the top of foot behind lower right calf.
Stretch your both hand to the straight forward to your face, twist
your both hand and cross both the arms in front of torso make a cross to join it together to do a pranam.
The back of your hand should be facing each other.
Press the right hands to the right a d the left hand to the left so that twisting hand should be facing each other.
Stay for 5 long deep breathe and then unwind your arms and then legs to release this pose.
Benefit:
- It helps in improving sense of balance.
- It helps in concentration.
- Stretches thighs,legs,arms and upper back.
- Strengthens and stretches the ankle,shoulders and calves.
- Helps in growth of muscles of thighs & hips.
CAUTION:
If you have any kind of injury to your health don't force your body to get into this pose.
But still if you feel you can fall for this pose, consult to the Doctor before doing it.
You should also see this Post:
The Journey of Yoga Explains Cow Pose
Cow Pose(Bitilasana)

Beginner's Tip
Cow Pose is also known by the name of "Bitilasana". Cow pose kis an easy and gentle pose for stretching spine and neck. It is basic pose to warm up your body. Before you fall for this Pose try to do Child Pose. It will be easy to fall for this pose. protect your neck just by raising towards up. Force your body to separate your breast touching to thighs to move up. It is best For spine and back.
Step by Step by Instruction:
You need to fall for this pose too:
Slide Plank Pose
Dolphin Pose
Dolphin Plank Pose
Balasana
Bakasana
Bharadvajasana
Yoga Pose: Cow Pose
Target: Reducing back pain, hips,shoulders
Cow Pose(Bitilasana)
Beginner's Tip
Cow Pose is also known by the name of "Bitilasana". Cow pose kis an easy and gentle pose for stretching spine and neck. It is basic pose to warm up your body. Before you fall for this Pose try to do Child Pose. It will be easy to fall for this pose. protect your neck just by raising towards up. Force your body to separate your breast touching to thighs to move up. It is best For spine and back.
Step by Step by Instruction:
- Come on the Yoga mat. Begin with Child pose.
- Fall on your knees and hands down to the floor in a "tabletop" position.
- Make sure your knees are directly below your hips and your hands down to your breast.
- Your wrist, elbow and leg should be perpendicular to the ground floor.
- Inhale and Push your back inside, down towards the floor .
- Now exhale and pull your stomach back towards up.
- Repeat it for 8 to 10 times.
- Release your hand and sit back to original position.
Benefits:
- It builds inner core strength.
- It helps in reducing belly fat.
- This asana is good to do during Menstruation.
- It improves blood circulation and respiratory disease.
- It stretches back and arm.
- It strengthens shoulder, hips and thighs.
CAUTION:
If you have any kind of injury to your health recently, try to avoid doing it.But If you feel comfort for reducing back pain or any kinds of pain, consult to the Doctor before falling for this Pose.
You need to fall for this pose too:
Slide Plank Pose
Dolphin Pose
Dolphin Plank Pose
Balasana
Bakasana
Bharadvajasana
The Journey of Yoga explains Bakasana Pose
Target: Thighs,arm,wrist,belly fat
1.Crow -Bakasana:

How to do it?
- Keep both palm on the floor or Yoga mat.
- Start in downward dog position (palm pressed into mat,feet hip-width apart) and walk feet forward until knees touches your arms.
- Bend your elbows,lift heels off floor,and rest knees against the outside of your upper arms.
- Keep toes on floor, abs engaged and leg pressed against arms.
- Keep focus or concentrate at one place.
- Stay in this Pose for 15 sec to 1 minute.
- Release your leg gently down to the floor,and lift your hand to come back to actual position.
Benefits:
- The Crow yoga pose strengthens the wrist, forearms and abdomen.
- It stretch the hamstring.
- It improves Balance which is crucial for this pose.
- It also improves digestive system.
- It reduces belly fat.
Caution:
Before you fall for this pose ensure that you don't have back or knee injury.It may have crucial bad effect to your health. Even if you feel you are fit for this kindly consult to doctor to take advice before doing.
You need to see this post also:
Padangusthasana
Balasana
Ananda Balasana
Bharadvajasana
Parivartta baddha Trikonasana
Padangusthasana
Balasana
Ananda Balasana
Bharadvajasana
Parivartta baddha Trikonasana
The Journey of yoga Explains Basic yoga pose for beginners
1. Savasana(Corpse Pose)
As Yoga has become modern exercise which shown it's own benefits to the physical and mental endeavors. The art of relaxation is harder than it looks. We all may have that art by enduring our body to some limit.
This is one of the basic pose that any beginner can do it. Most important this pose will let you know how to sleep better during sleeping time.
Step by step Instruction:
- Come on the yoga mat or on the floor.
- Simply lie on the mat.
- Now open your both leg straight to the outside as both the leg should parallely and close.
- Spread your both the arm on the floor side by your thighs.
- Open your palm and spread it on the floor.
- Look or mak a concentrate at one point and take a deep breath and exhale it.
- Do it for 10 to 15 times.
Benefits:
- It provides a better sleeping position.
- It helps to release the stress.
- It makes your body and mind to relax as well being.
- "Shavasana" helps in reducing heart beat and blood pressure.
- It provides deep relaxation and, reduce the metabolic rate and reduce anxiety.
2. Ananda Balasana
- The name Ananda means "Blissful" Bala means "Baby" Asana means "Pose. So Ananda Balasana Pose is also called "Happy Baby Pose".
- This is basic level of asana. This asana is very effective for baby as it has a positive impact on the body.
- Before you do this asana make sure that your stomach are empty. You need to keep a gap of at least 4 to 6 hours between your meal and work-out.
To know in detail about Benefits of Ananda Balasan click here:
3. Balasana
Child Pose is also known as "Balasana". Balasana means Bala refers "Child" And Asana refers "Pose". It is basic pose which you can do early morning at your bed also. Child Pose is one of the gentle resting pose which helps you to stretches thighs, low back, hips, knees and ankle. @TheJourneyofYogaAsana
The menstruation cycle is very delicate. You may be the one who can be in any of the state. After working whole day, travelling,stressed and doing ups and down you might feel low so you understand better to avoid it.
To know in detail about Benefits of Balasan click here:
4. Chair Pose:
To know in detail about Benefits of Chair Pose click here:
5. Eagle Pose:
To know in detail about Benefits of Eagle Pose click here:
3. Balasana
Child Pose is also known as "Balasana". Balasana means Bala refers "Child" And Asana refers "Pose". It is basic pose which you can do early morning at your bed also. Child Pose is one of the gentle resting pose which helps you to stretches thighs, low back, hips, knees and ankle. @TheJourneyofYogaAsana
The menstruation cycle is very delicate. You may be the one who can be in any of the state. After working whole day, travelling,stressed and doing ups and down you might feel low so you understand better to avoid it.
To know in detail about Benefits of Balasan click here:
4. Chair Pose:
It is the most intensely powerful pose. This pose strengthen the muscles of the thighs, legs and arms.It builds willpower on the body and the mind.
Being a beginner it isn't easy to stretch out out the body,but regular practice was enough to fabricate my body on the Yoga mat. Into every session of Half an hour, i had fallen multiple times, felt pain, sweaty, and had almost made my mind-Not to give up.
Being a beginner it isn't easy to stretch out out the body,but regular practice was enough to fabricate my body on the Yoga mat. Into every session of Half an hour, i had fallen multiple times, felt pain, sweaty, and had almost made my mind-Not to give up.
This yoga is beneficial for those who is suffering from conditions, such as chronic pain, carpal tunnel syndrome.
5. Eagle Pose:
Garudasana name is usually comes from, Garuda" The king of birds" asana means "Pose". Garuda word was originally identified with" all the consuming power of god's rays".In english this pose is rendered as "Eagle Pose".
To know in detail about Benefits of Eagle Pose click here:
The Journey of yoga Explains Chakrasana
Yoga : Chakrasana(Wheel Pose)
Target: Back bend, Flexibility, Arm, Hips, thighs
Level: Advance
Chakrasana
(Urdhva Dhanurasana):
(Urdhva Dhanurasana):
Beginner's Tips:
Chakrasana is also called Wheel Pose because when you get into this pose, it forms a shape of wheel.
This Pose is considered as one of the tough asana because it's totally body stretching yoga asana. If you are beginner or new to this asana you will feel difficulty as you bend your body, arms and shoulders. While doing this pose it not only overtax your arm but will also tend to compress the lower spine.
So, before you go for this asana you need to do some basic asana like Mermaid Pose( king Pose), Cow Pose, Bhujangasana, Urdhva Mukha Svanasana, Siddhasana, Ardha chandrasana, Virasana, Halasana. It will bring flexibility and open your arms and heart
Chakrasana preparatory Poses:
You can watch over here:
You can watch over here:
Step By Step Instructions:
- Chakrasana is one of the pose that can be done in both the way by sleeping as well as standing position.
- If you are beginner i will suggest you to start with the sleeping position.
- Come on the Yoga mat or on the Floor, Start with Savasana Pose.
- Now Fold your leg through your knees and make sure that your both the feet and your back touch the floor firmly.
- Move your both the hand towards the back side passing it over head and keep aside of your head placing your palm inward direction.
- Push your lower back towards upward by making force on the palm and feet.
- As your lower back slightly raised then push your upper back shoulder towards up.
- Allow your head to fall gently behind, in between both the hand and keep your neck relaxed.
- Still you feel it's not complete pose that you are doing you can move your hand or leg towards inside of your body.
- Stay in this pose for 30 second to a minute and inhale and exhale while doing the asana.
- Now you bring down your lower back slowly and release your hand slightly all together and put all your body weight down on the floor, Bring your back folded hand down on the floor and come back to actual position.
Benefits:
- It is a backbend posture which brings flexibility & strength to spine.
- This asana is very beneficial for asthma patients.
- It opens the chest and arms.
- It stretch arms and spine.
- This asana helps in strengthening the muscles of hand and reproductive organ.
- It stimulates the endocrine glands and maintain the body metabolism.
- It helps in purification and circulation of the blood.
- It reduces stress and anxiety.
- It brings activeness to your body as it builds stamina.
- It sharpens eyesight.
Caution:
Since Chakrasana puts lots of load & weight on your wrist so it is not recommended for those who is having any kind of back injury or spinal injury. Try to avoid if you have glaucoma and high blood pressure. If you feel its a long back injury and you are comfortable to do this asana, consult to the doctor before you fall for this pose.
You need to go through this asana
The Journey of Yoga Explains Ardha Pincha Mayurasana:
Yoga: Ardha Pincha Mayurasana
Target: Hips, waist, arms, Reduce belly
Level: Advance
Ardha Pincha Mayurasana:
Beginner's Tips:
If you are beginner for this pose, start with Utkatasana pose. Make your body bend towards up and down. make a leg and hand movement to get stretchable to get into this pose. Doing this you will easily fall for this asana.
If you are beginner for this pose, start with Utkatasana pose. Make your body bend towards up and down. make a leg and hand movement to get stretchable to get into this pose. Doing this you will easily fall for this asana.
Step by Step instruction:
- It is basic Yoga Asana. Ardha Pincha Mayurasana is standing asana. and a mild inversion pose.
- Start with Tadasana Yoga pose. Come on the Yoga mat and stand straight.
- Now Bring your both leg closer and parallel to each other.
- Bend towards forward getting on your knees and hands.
- Place your forearms on the floor, ensuring your both elbows and shoulder are in same straight line.
- Head down your head in between both the elbows.
- Lift your hip and back. As you Pose tuck your toes and keep your leg straight.
- Inhale and take a breath while raising hips.
- Moves your hips back and exhale.
- Lift your forearms and your elbow move back and stand straight to the actual position.
- Stay in this pose for 15 sec to a minute.
Benefit:
- This asana helps you to calm the brain and relieves stress.
- It helps in stimulating the reproductive organs, and reduce menstrual discomfort.
- it strengthens legs and arms.
- It helps in improving digestion.
- It is an aid for asthma,blood [pressure and fat feed].
- It stretches hamstring, shoulders.
Caution:
Avoid doing these asan if you have asthma & diarrhea.If you have any kind of injury to your health, consult to the doctor or Yoga instructor before you start practicing.
You may also like to go with these Pose :
Mermaid Pose
Dolphin Pose
Ananda Balasana
Garudasana
Balasana
The Journey of Yoga explains "Mermaid" yoga pose
Yoga Pose: "Mermaid"(Advance pose)
Equipment needed: Yoga mat
Target:Hips,Shoulder,Thighs,Chest, Knees
Mermaid Pose (Eka pada Rajakapotasana)
|
| Mermaid (Eka Pada Rajakapotasana) |
"Mermaid " Yoga Pose is one of the advanced yoga pose. It's one of my favorite yoga poses of all time. It may be tricky for you at initially as it requires back bend.So not to worry, i will teach you from the basic that will make easy for you to do. Rajakapotasana is a seated back bending asana in modern exercise. This pose deepens and intensifies the hip stretch while adding more advanced back bend.
"Mermaid Pose" is also known as Heart open pose
I remember when i did it for the first time in a while, it was easy for me to do, because i have practiced other yoga which required back bend posture like ( Plank Pose, Halasana). So don't ever try to achieve the perfect pose at initial stage only.
If you think you can do, then make sure you are fully comfortable with all your body parts and also warm your thighs and hips thoroughly before trying "Mermaid". Everything requires practice before reaching to final stage.
Beginner's Tip:
By cultivating the strength and fluidity of "Mermaid" throughout the practice. The more you maintain the strength and stability that comes from your arms and leg, the more you will be able to open to the feelings of fluidity in this pose by strengthening the legs and pulling it to the upwards along the length of your spine.
Step by Step instruction for "Mermaid"
- To get started do the several round of Sun Salutation then perform warrior Ⅰ and Warrior Ⅱ extended side angle.
- Sit on the mat or floor by crossing both legs.
- Now unwind your one leg and bring it back to your hips.
- Keep other leg folded as it is.
- Move your one hand to the back of shoulder passing it through one side of your head.
- Other hand take back in such a way that you can hold both the palm one over the other.
- Fold your back sided leg through knees towards up to hold it over both the joined and.
- Move your face towards the folded leg on the floor.
- Stay in this pose for 30 sec to a minute.
- Now bring back your back side folded leg on the floor and release both the hand slowly to come back.
Mermaid's Benefits:
- It improves control over your sexual desires.
- It helps in open chest and shoulders.
- It brings more flexibility, stronger lower back and hips flexors.
- You will get freedom from back ache.
- it makes pelvic stronger.
Caution:
Try to avoid doing this if you have any kind of injury or chronic injury to the shoulder, knees and ankle. And if you have experienced high or low blood pressure or heart disease better do not practice. But still if you feel comfortable,consult to the doctor before falling into this pose.
You may also like to go with these Pose :
Bakasana
Bitilasana(Cow pose)
Garudasana(Eagle Pose)
Balasana (Child Pose)
The Journey of Yoga Explains Garudasana (Eagle Pose)
Yoga: Garudasana
Target: Hips,shoulder, arm
Target: Hips,shoulder, arm
Gaudasana(Eagle Pose)
Garudasana name is usually comes from, Garuda" The king
of birds" asana means "Pose". Garuda word was originally
identified with" all the consuming power of god's rays".
In english this pose is rendered as "Eagle Pose".
Start doing with the standing pose (Tadasana). Bend your knees
slightly and cross your right thighs over the left thigh just by like twisting one leg over the other.
Point your left toes towards the floor and Apply force on toes of the left leg, hook the top of foot behind lower right calf.
Stretch your both hand to the straight forward to your face, twist
your both hand and cross both the arms in front of torso make a cross to join it together to do a pranam.
The back of your hand should be facing each other.
Press the right hands to the right a d the left hand to the left so that twisting hand should be facing each other.
Stay for 5 long deep breathe and then unwind your arms and then legs to release this pose.
Benefit:
- It helps in improving sense of balance.
- It helps in concentration.
- Stretches thighs,legs,arms and upper back.
- Strengthens and stretches the ankle,shoulders and calves.
- Helps in growth of muscles of thighs & hips.
CAUTION:
If you have any kind of injury to your health don't force your body to get into this pose.
But still if you feel you can fall for this pose, consult to the Doctor before doing it.
You should also see this Post:
The Journey of Yoga Explains Cow Pose
Cow Pose(Bitilasana)
Beginner's Tip
Cow Pose is also known by the name of "Bitilasana". Cow pose kis an easy and gentle pose for stretching spine and neck. It is basic pose to warm up your body. Before you fall for this Pose try to do Child Pose. It will be easy to fall for this pose. protect your neck just by raising towards up. Force your body to separate your breast touching to thighs to move up. It is best For spine and back.
Step by Step by Instruction:
You need to fall for this pose too:
Slide Plank Pose
Dolphin Pose
Dolphin Plank Pose
Balasana
Bakasana
Bharadvajasana
Yoga Pose: Cow Pose
Target: Reducing back pain, hips,shoulders
Cow Pose(Bitilasana)
Beginner's Tip
Cow Pose is also known by the name of "Bitilasana". Cow pose kis an easy and gentle pose for stretching spine and neck. It is basic pose to warm up your body. Before you fall for this Pose try to do Child Pose. It will be easy to fall for this pose. protect your neck just by raising towards up. Force your body to separate your breast touching to thighs to move up. It is best For spine and back.
Step by Step by Instruction:
- Come on the Yoga mat. Begin with Child pose.
- Fall on your knees and hands down to the floor in a "tabletop" position.
- Make sure your knees are directly below your hips and your hands down to your breast.
- Your wrist, elbow and leg should be perpendicular to the ground floor.
- Inhale and Push your back inside, down towards the floor .
- Now exhale and pull your stomach back towards up.
- Repeat it for 8 to 10 times.
- Release your hand and sit back to original position.
Benefits:
- It builds inner core strength.
- It helps in reducing belly fat.
- This asana is good to do during Menstruation.
- It improves blood circulation and respiratory disease.
- It stretches back and arm.
- It strengthens shoulder, hips and thighs.
CAUTION:
If you have any kind of injury to your health recently, try to avoid doing it.But If you feel comfort for reducing back pain or any kinds of pain, consult to the Doctor before falling for this Pose.
You need to fall for this pose too:
Slide Plank Pose
Dolphin Pose
Dolphin Plank Pose
Balasana
Bakasana
Bharadvajasana
The Journey of Yoga explains Bakasana Pose
Target: Thighs,arm,wrist,belly fat
1.Crow -Bakasana:
How to do it?
- Keep both palm on the floor or Yoga mat.
- Start in downward dog position (palm pressed into mat,feet hip-width apart) and walk feet forward until knees touches your arms.
- Bend your elbows,lift heels off floor,and rest knees against the outside of your upper arms.
- Keep toes on floor, abs engaged and leg pressed against arms.
- Keep focus or concentrate at one place.
- Stay in this Pose for 15 sec to 1 minute.
- Release your leg gently down to the floor,and lift your hand to come back to actual position.
Benefits:
- The Crow yoga pose strengthens the wrist, forearms and abdomen.
- It stretch the hamstring.
- It improves Balance which is crucial for this pose.
- It also improves digestive system.
- It reduces belly fat.
Caution:
Before you fall for this pose ensure that you don't have back or knee injury.It may have crucial bad effect to your health. Even if you feel you are fit for this kindly consult to doctor to take advice before doing.
You need to see this post also:
Padangusthasana
Balasana
Ananda Balasana
Bharadvajasana
Parivartta baddha Trikonasana
Padangusthasana
Balasana
Ananda Balasana
Bharadvajasana
Parivartta baddha Trikonasana

- Rinki Bhardwaj
- Its my pleasure to introduce myself. I am Rinki Bhardwaj an accomplished content writer, editor,artist,creator and specially in content. Basically, I am an Indian.I am a Software Engineer in Computer and Apllication. As being a good artist, i have been awarded with Gold medal for Art and Craft in 2019 by International Recognized Organisation.And awarded with silver medal in badmintion at cluster level in 2016.. Erstwhile I have been lecturer in computer, Maths and science in Bharti College of Education for a year. Forthwith i have started working in MNC's as Credit analyst in Accounting and Finance.I'm lucky enough to get started working on website in the early of 2000s. As i have continued doing work-Out since my childhood, from then i have got an interest in doing Yoga and that made me curious to explore about Yoga to you people.I love to think,write and explore, and i love to share my thoughts and ideas by writing poem,story and blog. The content i write is usually to motivate people and to learn the lesson through our mistakes as usual we do.I have seen several of things come and go, but one of thing that's stuck around without changing too much is blogging.